Tuesday 31 December 2013

UFO's - not the flying ones!

"I've been put on this earth to sew and finish a certain number of things. 

I am so far behind right now…I will never die!"

~author unknown


Ok so before I started quilting I thought UFO's where those things that fly in the sky. In the quilting world UFO's are "unfinished objects" those quilts we start to make but never seem to finish.

Unfortunately I have a very short attention span so if a quilt top takes me too long to put together or doesn't quite look how I had planned it ends up in a box or basket. And please don't get me started about quilts needing binding... If it's a customer order it gets done as a matter of priority but if it's a project for me (in most cases) it will never see the light of day.

So today I am sharing my UFO's which comprise mostly of blocks that are ready to be sewn together to make a beautiful quilt that I just haven't got around to yet. You know when that thing called life gets in the way.

Here they are (in no particular order):

This one just waiting for binding

This one has now been quilted and too is waiting for binding

My first Chevron quilt still in pieces..lots of them arghh
 
Another one still in pieces just couldn't quite get it to work


Yep this one is in pieces too


and finally this one....

Wow after looking through these pictures I didn't realised I had so many unfinished quilts. To make matters worse I have two more that I just don't have pictures of in various boxes..... Given it's a new year tomorrow perhaps I could at least promise to finish one of them - maybe..

So tell me - do you have a room full of UFO's like me - and I don't mean the flying ones !!

Monday 30 December 2013

Simple Jelly Roll Quilts

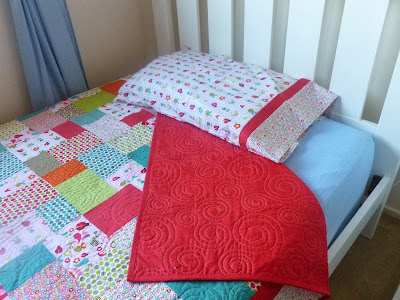
Well by now you know about my pre cut obsession (yes I admit it!) so when I was asked to make a cot quilt for a baby shower gift for a little girl at short notice what better way than to make a simple jelly roll quilt - so I made two !!


The first one went off to her new home and was made with Sweetcakes by Doodlebug Designs for Riley Blake Designs. As I have 3 boys I absolutely love making anything girly and this one was just so pretty I didn't want to part with it.


The next jelly roll quilt was made with Little Red Riding Hood by Tasha Noel for Riley Blake Designs. I'm thinking that I'm a little obsessed with Riley Blake fabric at the moment don't you ??


This one is available for sale on my Facebook page here.

Sunday 29 December 2013

Markets and more quilts


I have been toying with the idea of attending a few markets to lift the profile of my business a little but having a young baby and not a lot of time to spare I didn't want to be out all day. So I ended up attending a local babies and kids market which only goes for half a day so was perfect for me. I must say I had a blast especially meeting other stallholders and I loved people coming up to me complementing me on my quilts.

As most quilters know quilting is a passion and not really a basis for making a living by so my business fuels my passion for quilts (there are only so many friends and family you can make quilts for) and my other products support my quilt making obsession. I only wish I had more hours in the day to quilt !!
Here is me at the local markets - proud as punch showing off all my goodies.


What else have I been up to making more quilts of course!! I whipped up these 2 over the weekend just because I could. These are both available on my Facebook page here.


The quilting on this one is simply just straight lines approximately 10cm apart. I did however try something different by machine sewing the binding on with a decorative stitch. I must say I like to hand bind my quilts but for the cot sized ones machined binding just adds that extra durability especially with the more frequent washing. Here is a close up of the binding.


This next quilt was made with Sasparilla by October Afternoon for Riley Blake designs and was just made from one Rolie Polie of 22 x 2.5" strips. The pattern I used was called "Jelly Roll Jam" which is a free pattern from the Fat Quarter shop and also has a You Tube video you can watch too.

You can get two quilts from a jelly roll of 42 strips or one quilt like mine from a Rolie Polie. Finished size of the quilt is 36.5" x 36.5" and went together so fast so is a great pattern to use when in a hurry.


Friday 27 December 2013

The Big Churn Dash


So for the last two years my sister has been asking (well begging) me to make her a quilt for her bed. Problem is she has a king size bed and my largest quilts thus far have been double bed sized. But as it was her 40th birthday this year I really wanted to do something special for her.

The brief was a king size quilt, simple block design (so it would go together quickly) and purple fabric (her favourite colour).

I designed her quilt using simple churn dash blocks with 1.5" white sashing in between blocks and 2.5" white borders.

 
I decided given the size I would cut out all my pieces first then put each block together. A total of 42 blocks would make up the quilt 6 across and 7 down.
 
 
Usually I never square up my blocks (takes to long) but after much advice from my fellow quilters I decided to go through the process and I'm so glad I did. The extra time it took was well worth it in the end.
 
So with front and back completed my baby was off to the quilters (no I don't have a longarm but like most I wish I had - and secretly hope one day I will !!)
 
 
Next it was binding time (yep my least favourite part). I don't really know why I put off binding my quilts because once I get started I quite enjoy it !! I found this gorgeous purple textured plaid in the Sweet Things range by Holly Holderman For Lakehouse Dry Goods, that tied in with the rest of my purples perfectly.
 
For me, I sew my binding on the front and hand stitch to the back. I wish I could machine it all but unfortunately my attempts so far have been futile and I must admit I do like the hand stitched finish.
 
 
and here she is in all her glory and I'm as proud as punch !!
 
Quilt Front
 

Reverse side of quilt
 
I quilt because I love it, it's my passion, my joy and I put my whole heart and sole in every piece I make. I send them to their new owner with love and hope they enjoy them as much as I have enjoyed making them.
 
But I have to ask - does anyone else have trouble giving away the quilts they make whether they are to friend or family or even commissioned pieces - I certainly do !!


Thursday 26 December 2013

The Minky Revolution

Have you noticed that this last winter there seemed to be an obsession with minky. That beautiful soft and cuddly fabric that everyone likes to touch? Well I had an influx of orders for minky backed blankets. Some were made with a plain cotton print on the front whilst others had a patchwork finish with 5" squares. Here are a few of my favourites.


For those of you that have ever sewn with minky you'll know what I mean when I cringe when the word sewing and minky are used in the same sentence. Yes the fabric is beautiful and soft but it has a mind of it's own and tends to move a lot when sewing so pins become your best friend - I use a whole box on one pram sized blanket!! So if you are thinking of making a minky blanket pins, pins and more pins is all I can say. Oh and the dotted one is easier to work with than the plain in case you are wondering.

I couldn't show you my blankets without showing you a picture of my little man enjoying his own special one too !!


Tuesday 24 December 2013

"Peak Hour" quilt

When Peak Hour Fabric by Kelly Wulfsohn for Riley Blake came out I was first in line to get myself a layer cake and a couple of yards of the Peak Hour traffic main fabric and I'm so glad I did. How cool is this fabric!


I was asked by a friend to make her little boy a single bed quilt and he loves anything car related - so this fabric hit the nail on the head. I really wanted to highlight the main fabric so that's exactly what I did. I decided to simply put a large piece of the main fabric in the centre and border with the layer cake blocks and I couldn't have been more happy with the result.

 
This quilt came together nice and quick I just had to be very careful with the measurements (which I'm not always that precise with - if truth be told...) to be sure the layer cakes stayed complete around the edges.


So what do you think?

Monday 23 December 2013

Making bunting - flags and shapes

In my last post I showed you some bunting I had made for my son to match his robot themed room so I thought I should talk more about it.


I don't really want to let the cat out of the bag (pardon the pun) but bunting is so simple to make - I was actually surprised at how quick it is to put together and it really doesn't use a lot of fabric either.

My absolute favourite bunting tutorial is here and is put together by Bride De Force. You really must watch the video if you ever want to make bunting it's all of a total of 3 minutes and 20 seconds.

As in the tutorial I pick three pieces of complementary fabric and attach nine flags to a piece of bias binding I buy from the local craft shop. Using this method my bunting is approximately three metres long and each flag measures 18cm across with an 18cm drop.

I have some for sale on my Facebook page here if you are interested.


So what is bunting used for. Basically to decorate a room. I have seen it traditionally in children's bedrooms but it is now popular at children's parties and even weddings. My last customer used it to decorate her daughters toy room.

On another note I absolutely adored the bunting made by Willow Tree Designs. Instead of the traditional flag bunting she makes various shapes and inspired me to make my own. Here are some examples of the shape bunting I made.


To make my shaped bunting I simply made a template, fused some heat and bond onto some fabric and hand cut the shapes out (this was the long tedious bit). They are double sided and fused together. I used the automatic button hole stitch on my sewing machine to make a button hole at the top of each shape and threaded some grosgrain ribbon through.


I then finished the ribbon off with some gold eyelets for easy hanging. The shaped bunting was three metres in length with twelve shapes in total. To get into the festive season I also made some Christmas trees.


Saturday 21 December 2013

Robot Cot Quilt


My little man's room is set up in a robot theme so I thought I should really make something for him rather than always for everyone else. In saying that he is now 4 months old and still in his bassinette in my room but no matter I often pull the quilt out of the cot and use it as a play mat and it is big enough that both my boys lie on it together!

I wanted something quick and easy so ended up buying a piece of robot fabric and just adding a simple grey border.


So here is Matthew's robot quilt. It was slightly larger than the standard WOF so I added a pieced back with the left over off cuts.


I'm not too keen on wide backing fabrics as in my opinion they tend to be a little boring so I often now piece the backs with some matching backing fabric and left over fabrics from my quilt tops. It also ties the front and back of the quilt together nicely.

I think he likes it !!


And being me I also made a matching blanket, pillow and bunting and hey presto a new nursery set!!


Wednesday 18 December 2013

Another Double Slice layer cake quilt


Yes that's right. No sooner after making my first custom made quilt I was asked to make another. This time for a little girl. Her mum had seen my pictures of the Bungle Jungle quilt I had made and wanted one similar in girl fabric but not too pink and left the decision up to me.

I immediately thought of Alphabet Soup by Zoe Pearn for Riley Blake Designs. She had both a boy and girl range that were both super cute so I couldn't resist getting the girl range for this quilt.

So it was time for a lot of cutting and piecing. Sometimes I feel a bit said cutting up a layer cake - all that beautiful fabric being cut into little pieces....


I also made myself a design wall to layout all the squares to make sure I was happy with the overall design before sewing. There is tonnes of information out there about making design walls but mine is simply a piece of cotton batting hung up over my sewing room door with coat hangers - pretty simple huh - but does the job!

 
And the final result a beautiful double bed quilt and matching pillowcase for a special little girl.


Monday 16 December 2013

A fascination with Pre-Cuts


Yes pre-cuts I love them - jelly rolls, layer cakes, charm packs you name it, I have them all. I love being able to make a quilt with the whole fabric range from one designer and it takes the guesswork out of matching fabric - something I'm getting better at but have by no means mastered - yet..

As I said before my passion is quilting - in particular babies and children's quilts so when I was approached by a friend to make a double bed quilt for her son who was moving to his big boy bed how could I resist. The brief was simply a jungle theme and here is the result.


This quilt was made using Bungle Jungle by Tim and Beck for Moda Fabrics. I used a layer cake for the main part of the quilt and added 2 sets of borders from the same range. I used the Double Slice layer cake quilt tutorial from the Missouri Quilt Company which you can view here. I absolutely love the tutorials Jenny Doan and her team put together so be sure to check them out.


Let's talk pillowcases. These ones were made following yet another Missouri Quilt Company tutorial called Easy Tube Pillowcase tutorial. You can find the link here. The only problem with these is whilst they are really simple they don't have the envelope closure I prefer. I now make my pillowcases with the envelope closure it just gives a neater finish (I think) and isn't much more work at all. There's so many tutorials out there here is one I have used among others.


There you have it a beautiful but simple double bed quilt using pre cuts. I love how the red binding really makes the quilt pop.